deeplearning-ai/machine-learning-yearning-cn: Machine Learning Yearning 中文版 - 《机器学习训练秘籍》 - Andrew Ng 著
摘录内容
Machine Learning Yearning 中文版
访问此处 开始在线阅读《机器学习训练秘籍》样稿,希望这本书对你们有所帮助!当前样稿仅供内容预览,非最终版本(历史版本可以在 release 中找到)。
来源:eradman/entr: Run arbitrary commands when files change
Run arbitrary commands when files change
来源:科技爱好者周刊(第 208 期):晋升制度的问题 - 阮一峰的网络日志
8、Gephi

一个跨平台的桌面软件,用来生成各种可视化图形效果,自称是 “用于图表的 Photoshop”。
Setting up a Kubernetes cluster using Docker in Docker | Callista
Setting up a Kubernetes cluster using Docker in Docker | Callista ![]()

|
Här finns tekniska artiklar, presentationer och nyheter om arkitektur och systemutveckling. Håll dig uppdaterad, följ oss på Twitter

In this blog post I will describe how to set up a local Kubernetes cluster for test purposes with a minimal memory usage and fast startup times, using Docker in Docker instead of traditional local virtual machines.
This blog post is part of the blog series - Trying out new features in Docker.
For a background on how Docker in Docker can help us to set up a local Kubernetes cluster, see the Background section in the blog post Setting up a Docker Swarm cluster using Docker in Docker.
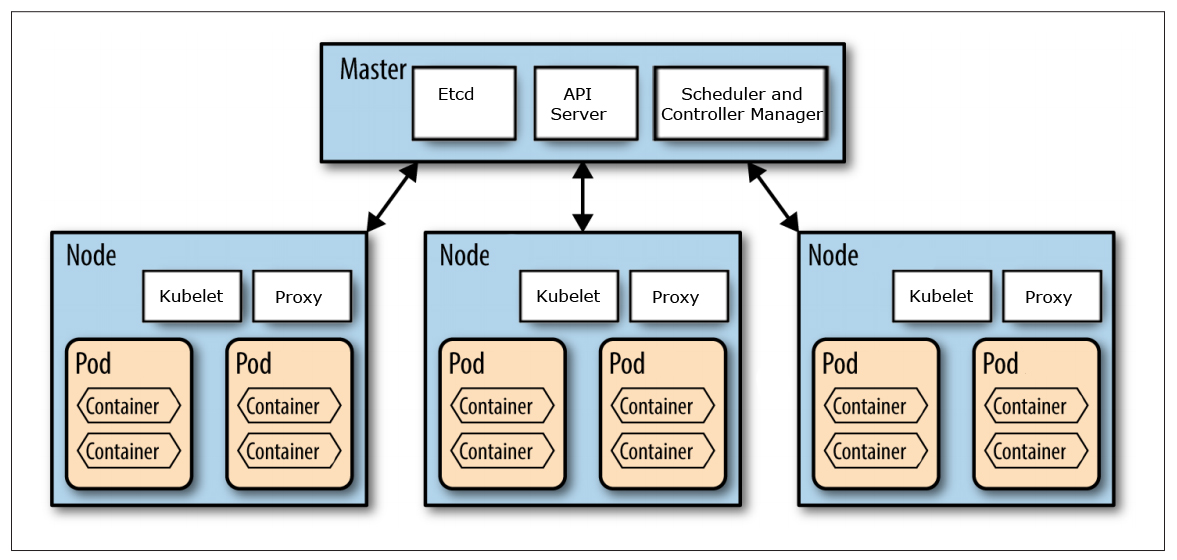
This blog post is not an introduction to Kubernetes and the components that builds up a Kubernetes cluster. For an introduction of the concepts used in Kubernetes see: kubernetes.io/docs/concepts/.
We are going to use the GitHub project Mirantis/kubeadm-dind-cluster to set up a Kubernetes cluster using Docker in Docker and we will use Docker for Mac to act as the Docker Host for the Kubernetes nodes (running as containers in Docker for Mac).
Source: http://nishadikirielle.blogspot.se/2016/02/kubernetes-at-first-glance.html
First, you need to have Docker for Mac installed, I’m on version 17.09.1-ce-mac42.
Next, you also need to have jq and md5sha1sum installed to be able to follow my instructions below. If you use Homebrew, they can be installed with:
brew install jq
brew install md5sha1sum
Finally, clone the Git repo Mirantis/kubeadm-dind-cluster from GitHub and jump into the fixed folder:
git clone https://github.com/Mirantis/kubeadm-dind-cluster.git
cd kubeadm-dind-cluster/fixed
We are good to go!
Start up a Kubernetes v1.8 cluster requesting 3 worker nodes in the cluster (default is 2):
NUM_NODES=3 ./dind-cluster-v1.8.sh up The first time the up command is executed it will take a few minutes and produce lot of output in the terminal window…
…in the end it should say something like:
NAME          STATUS    ROLES     AGE       VERSION
kube-master   Ready     master    2m        v1.8.4
kube-node-1   Ready     <none>    1m        v1.8.4
kube-node-2   Ready     <none>    1m        v1.8.4
kube-node-3   Ready     <none>    47s       v1.8.4
* Access dashboard at: http://localhost:8080/ui
Note: If you start up the cluster again later on, it will only take a minute.
Verify that you can see the master and worker nodes as ordinary containers in Docker for Mac:
docker ps It should report something like:
CONTAINER ID        IMAGE                                COMMAND                  CREATED             STATUS              PORTS                      NAMES
766582a93d1f        mirantis/kubeadm-dind-cluster:v1.8   "/sbin/dind_init s..."   9 hours ago         Up 9 hours          8080/tcp                   kube-node-3
e1fc6bec1f23        mirantis/kubeadm-dind-cluster:v1.8   "/sbin/dind_init s..."   9 hours ago         Up 9 hours          8080/tcp                   kube-node-2
b39509b9db77        mirantis/kubeadm-dind-cluster:v1.8   "/sbin/dind_init s..."   9 hours ago         Up 9 hours          8080/tcp                   kube-node-1
a01be2512423 mirantis/kubeadm-dind-cluster:v1.8 "/sbin/dind_init s..." 9 hours ago Up 9 hours 127.0.0.1:8080->8080/tcp kube-master Ok, so let’s see if we actually have a Kubernetes cluster up and running:
kubectl get nodes It should result in a response like:
NAME STATUS AGE VERSION
kube-master Ready 2m v1.8.4
kube-node-1 Ready 55s v1.8.4
kube-node-2 Ready 1m v1.8.4
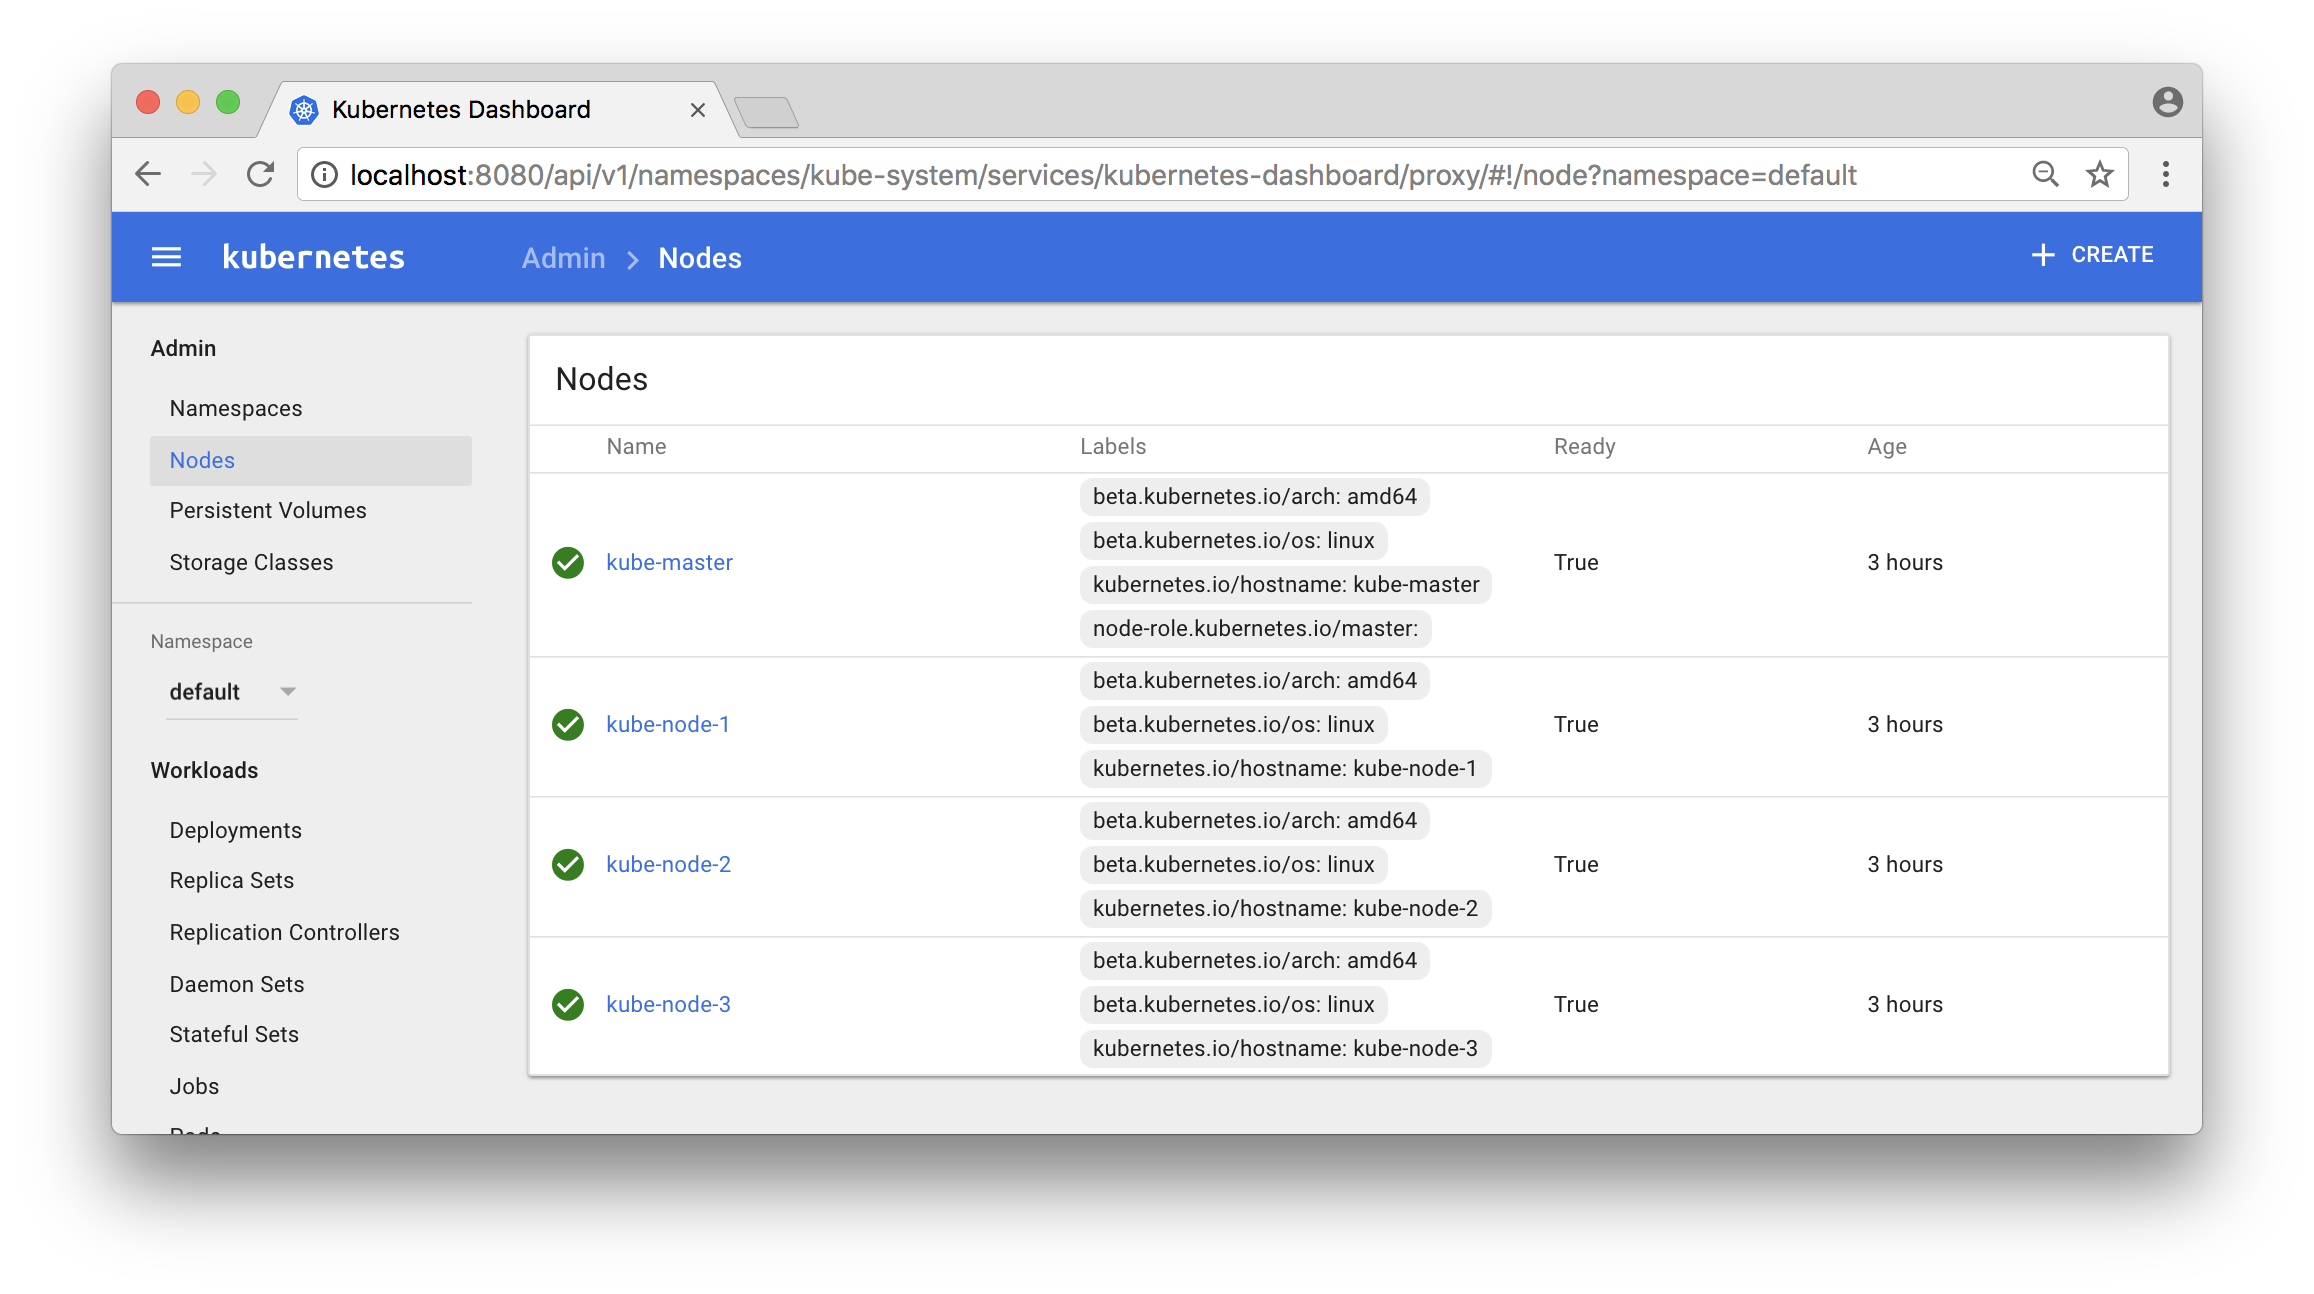
kube-node-3 Ready 1m v1.8.4 Also try out Kubernetes Dashboard at: localhost:8080/ui
Click on the “Nodes” - link in the menu to the left and you should see something like:
Now, let’s deploy a service and try it out!
I have a very simple Docker image magnuslarsson/quotes:go-22 (written in Go) that creates some random quotes about successful programming languages.
We will create a Deployment of this Docker Image and a Service that expose it on each node in the Kubernetes cluster using a dedicated port (31000). The creation of the Deployment object will automatically also create a Replica Set and a Pod.
Note: In more production like environment we should also set up an external load balancer, like HAProxy or NGINX in front of the Kubernetes cluster to be able to expose one single entry point to all services in the cluster. But that is out of scope for this blog post and left as an exercise for the interested reader :-)
First, switch to the default namespace:
kubectl config set-context $(kubectl config current-context) --namespace=default The default namespace should only contain one pre-created object, run the command:
kubectl get all It should report:
NAME             CLUSTER-IP   EXTERNAL-IP   PORT(S)   AGE
svc/kubernetes   10.96.0.1    <none>        443/TCP   5h
Create a file named quotes.yml with the following command:
cat <<EOF > quotes.yml
apiVersion: apps/v1beta1
kind: Deployment
metadata:
  name: quotes
  labels:
    app: quotes-app
spec:
  replicas: 1
  selector:
    matchLabels:
      app: quotes-app
  template:
    metadata:
      labels:
        app: quotes-app
    spec:
      containers:
      - name: quotes
        image: magnuslarsson/quotes:go-22
        ports:
        - containerPort: 8080
---

apiVersion: v1
kind: Service
metadata:
  name: quotes-service
spec:
  type: NodePort
  selector:
    app: quotes-app
  ports:
    - port: 8080
      targetPort: 8080
      nodePort: 31000
EOF
Create the Deployment and Service objects with the following command:
kubectl create -f quotes.yml Verify that we got the expected objects created, using the following command:
kubectl get all Expect output:
NAME                         READY     STATUS    RESTARTS   AGE
po/quotes-77776b5bbc-5lll7   1/1       Running   0          45s

NAME                 CLUSTER-IP       EXTERNAL-IP   PORT(S)          AGE
svc/kubernetes       10.96.0.1        <none>        443/TCP          5h
svc/quotes-service   10.105.185.117   <nodes>       8080:31000/TCP   45s

NAME            DESIRED   CURRENT   UP-TO-DATE   AVAILABLE   AGE
deploy/quotes   1         1         1            1           45s

NAME                   DESIRED   CURRENT   READY     AGE
rs/quotes-77776b5bbc   1         1         1         45s
Note: In the output above short names are used for object types:
po: Podsvc: Servicedeploy: Deploymentrs: Replica Set
We can now try it out using curl from one of the worker nodes:
docker exec kube-node-2 curl localhost:31000/api/quote -s -w "\n" | jq Output should look like:
{
  "ipAddress": "quotes-77776b5bbc-5lll7/10.192.3.4",
  "quote": "In Go, the code does exactly what it says on the page.",
  "language": "EN"
}
The most interesting part of the response from the service is actually the field ipAddress, that contains the hostname and ip address of the pod that served the request, quotes-77776b5bbc-5lll7/10.192.3.4 in the sample response above.
This can be used to verify that scaling of a service actually works. In the output from a scaled service we expect different values in the ipAddress - field from subsequent requests, indicating that the request is load balanced over the available pods.
Let’s try it out, shall we?
First, start a loop that use curl to sends one request per second to the quote-service and prints out the ipAddress - field from the response:
while true; do docker exec kube-node-2 curl localhost:31000/api/quote -s -w "\n" | jq -r .ipAddress; sleep 1; done Initially the output should return one and the same hostname and IP address, since we only have one pod running in the service:
quotes-77776b5bbc-5lll7/10.192.3.4
quotes-77776b5bbc-5lll7/10.192.3.4
quotes-77776b5bbc-5lll7/10.192.3.4
quotes-77776b5bbc-5lll7/10.192.3.4
Now, scale the quote-service by adding 8 new pods to it (9 in total):
kubectl scale --replicas=9 deployment/quotes Verify that you can see all 9 quote-service pods and also to what node they are deployed:
kubectl get pods -o wide Expected output:
NAME                      READY     STATUS    RESTARTS   AGE       IP            NODE
quotes-77776b5bbc-42wgk   1/1       Running   0          1m        10.192.4.9    kube-node-3
quotes-77776b5bbc-c8mkf   1/1       Running   0          1m        10.192.3.8    kube-node-2
quotes-77776b5bbc-dnpm8   1/1       Running   0          25m       10.192.3.4    kube-node-2
quotes-77776b5bbc-gpk85   1/1       Running   0          1m        10.192.2.8    kube-node-1
quotes-77776b5bbc-qmspm   1/1       Running   0          1m        10.192.4.11   kube-node-3
quotes-77776b5bbc-qr27h   1/1       Running   0          1m        10.192.3.9    kube-node-2
quotes-77776b5bbc-txpcq   1/1       Running   0          1m        10.192.2.9    kube-node-1
quotes-77776b5bbc-wb2qt   1/1       Running   0          1m        10.192.4.10   kube-node-3
quotes-77776b5bbc-wzhzz   1/1       Running   0          1m        10.192.2.7    kube-node-1
Note: We got three pods per node, as expected!
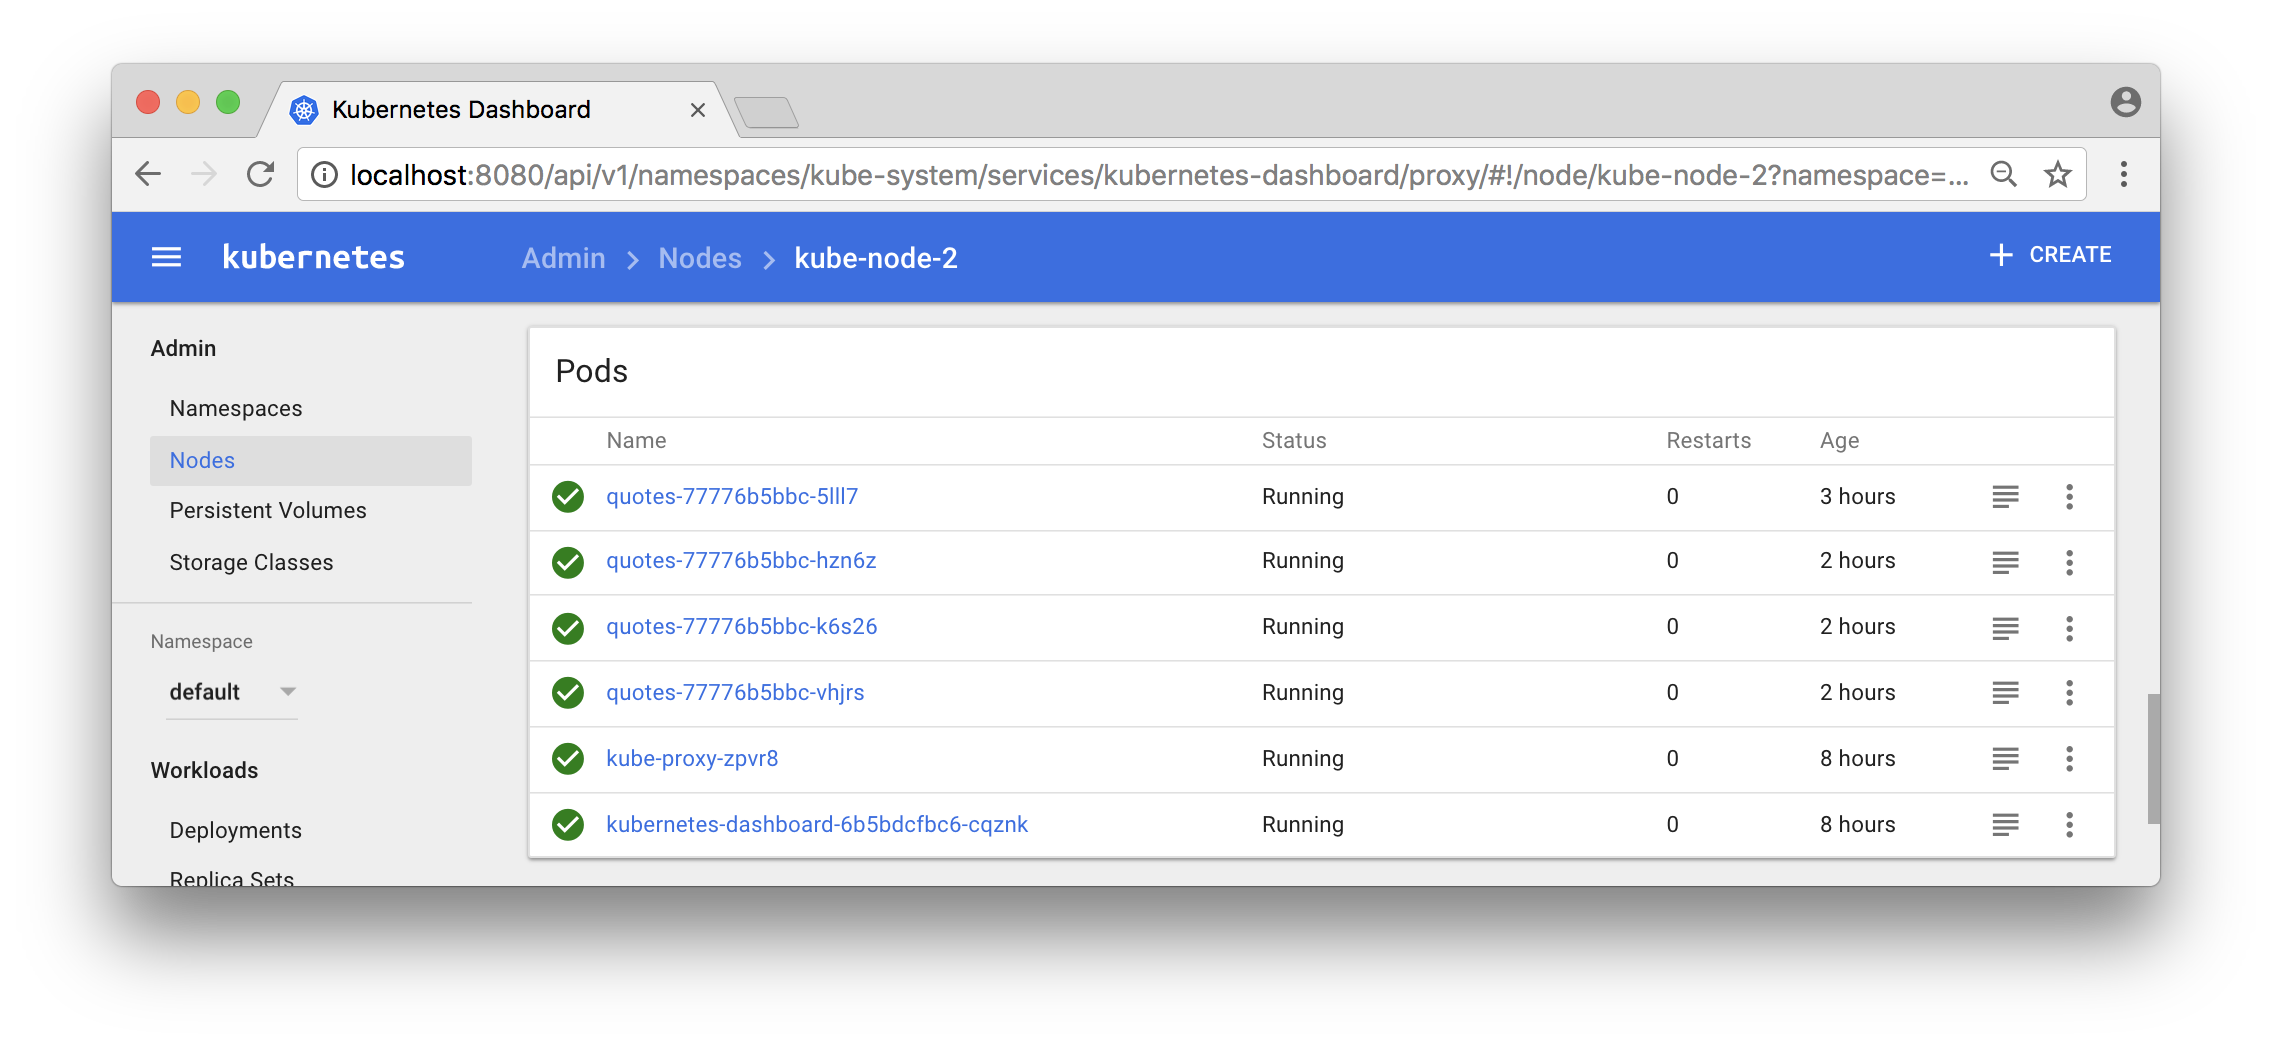
You can also use the Dashboard to see what pods that run in a specific node:
Now, the output from the curl - loop should report different hostnames and ip addresses as the requests are load balanced over the 9 pods:
quotes-77776b5bbc-gpk85/10.192.2.8
quotes-77776b5bbc-42wgk/10.192.4.9
quotes-77776b5bbc-txpcq/10.192.2.9
quotes-77776b5bbc-txpcq/10.192.2.9
quotes-77776b5bbc-wb2qt/10.192.4.10
quotes-77776b5bbc-txpcq/10.192.2.9
Great, isn’t it?
Now, let’s expose the container orchestrator, i.e. Kubernetes, to some problems and see if it handles them as expected!
First, let’s shut down some arbitrary pods and see if the orchestrator detects it and start new ones!
Note: We will actually kill the container that runs within the pod, not the pod itself.
Start a long running command, using the --watch flag, that continuously reports changes in the state of the Deployment object:
kubectl get deployment quotes --watch Initially, it should report:
NAME      DESIRED   CURRENT   UP-TO-DATE   AVAILABLE   AGE
quotes    9         9         9            9           1d
Note: The command hangs, waiting for state changes to be reported
To keep things relatively simple, let’s kill all quote-services running on the first worker node:
CIDS=$(docker exec kube-node-1 docker ps --filter name=k8s_quotes_quotes -q)
docker exec kube-node-1 docker rm -f $CIDS
The command should respond with the ids of the killed containers:
e780545ddd17
ddd260ba3f73
b4e07e736028
Now, go back to the “_deployment watch_” - command and see what output it produces!
It should be something like:
quotes    9         9         9         8         1d
quotes    9         9         9         7         1d
quotes    9         9         9         6         1d
quotes    9         9         9         7         1d
quotes    9         9         9         8         1d
quotes    9         9         9         9         1d
The output shows how Kubernetes detected that it got short of available pods and compensated that by scheduling new containers for the affected pods.
Now, let’s make it even worse by removing a worker node, simulating that it is taken off line for maintenance work. Let’s mark kube-node-3 as no longer accepting either existing pods or scheduling of new pods:
kubectl drain kube-node-3 --ignore-daemonsets The command reports back what pods that was evicted from the node:
pod "quotes-77776b5bbc-jlwtb" evicted
pod "quotes-77776b5bbc-7d6gc" evicted
pod "quotes-77776b5bbc-cz8sp" evicted
Kubernetes will however automatically detect this and start new ones on the remaining nodes:
kubectl get pods -o wide Reports back:
NAME                      READY     STATUS    RESTARTS   AGE       IP            NODE
quotes-77776b5bbc-28r7w   1/1       Running   0          11s       10.192.2.10   kube-node-1
quotes-77776b5bbc-7hxd5   1/1       Running   0          11s       10.192.3.10   kube-node-2
quotes-77776b5bbc-c8mkf   1/1       Running   0          7m        10.192.3.8    kube-node-2
quotes-77776b5bbc-dnpm8   1/1       Running   0          31m       10.192.3.4    kube-node-2
quotes-77776b5bbc-gpk85   1/1       Running   0          7m        10.192.2.8    kube-node-1
quotes-77776b5bbc-grcqn   1/1       Running   0          11s       10.192.2.11   kube-node-1
quotes-77776b5bbc-qr27h   1/1       Running   0          7m        10.192.3.9    kube-node-2
quotes-77776b5bbc-txpcq   1/1       Running   0          7m        10.192.2.9    kube-node-1
quotes-77776b5bbc-wzhzz   1/1       Running   0          7m        10.192.2.7    kube-node-1
Note: The three pods with an age of 11 sec are the new ones.
We can also see that the node is reported to being unavailable for scheduling of pods:
kubectl get node Reports:
NAME          STATUS                     AGE       VERSION
kube-master   Ready                      1d        v1.8.4
kube-node-1   Ready                      1d        v1.8.4
kube-node-2   Ready                      1d        v1.8.4
kube-node-3   Ready,SchedulingDisabled   1d        v1.8.4
Great!
Let’s wrap up by making the node available again:
kubectl uncordon kube-node-3 The node is now reported to be back on line:
kubectl get node Results in:
NAME          STATUS    AGE       VERSION
kube-master   Ready     1d        v1.8.4
kube-node-1   Ready     1d        v1.8.4
kube-node-2   Ready     1d        v1.8.4
kube-node-3   Ready     1d        v1.8.4
But none of the existing pods are automatically rescheduled to the node:
kubectl get pods -o wide Still reports that all pods runs on node 1 and 2:
NAME                      READY     STATUS    RESTARTS   AGE       IP            NODE
quotes-77776b5bbc-28r7w   1/1       Running   0          4m        10.192.2.10   kube-node-1
quotes-77776b5bbc-7hxd5   1/1       Running   0          4m        10.192.3.10   kube-node-2
quotes-77776b5bbc-c8mkf   1/1       Running   0          11m       10.192.3.8    kube-node-2
quotes-77776b5bbc-dnpm8   1/1       Running   0          36m       10.192.3.4    kube-node-2
quotes-77776b5bbc-gpk85   1/1       Running   0          11m       10.192.2.8    kube-node-1
quotes-77776b5bbc-grcqn   1/1       Running   0          4m        10.192.2.11   kube-node-1
quotes-77776b5bbc-qr27h   1/1       Running   0          11m       10.192.3.9    kube-node-2
quotes-77776b5bbc-txpcq   1/1       Running   0          11m       10.192.2.9    kube-node-1
quotes-77776b5bbc-wzhzz   1/1       Running   0          11m       10.192.2.7    kube-node-1
We can, however, manually rebalance our pods with the commands:
kubectl scale --replicas=6 deployment/quotes
kubectl scale --replicas=9 deployment/quotes
Verify:
kubectl get pods -o wide Reports the expected three pod per node again:
NAME                      READY     STATUS    RESTARTS   AGE       IP            NODE
quotes-77776b5bbc-2q26w   1/1       Running   0          1s        10.192.4.13   kube-node-3
quotes-77776b5bbc-bbhcb   1/1       Running   0          1s        10.192.4.14   kube-node-3
quotes-77776b5bbc-c8mkf   1/1       Running   0          13m       10.192.3.8    kube-node-2
quotes-77776b5bbc-dnpm8   1/1       Running   0          37m       10.192.3.4    kube-node-2
quotes-77776b5bbc-gpk85   1/1       Running   0          13m       10.192.2.8    kube-node-1
quotes-77776b5bbc-qr27h   1/1       Running   0          13m       10.192.3.9    kube-node-2
quotes-77776b5bbc-trrdh   1/1       Running   0          1s        10.192.4.12   kube-node-3
quotes-77776b5bbc-txpcq   1/1       Running   0          13m       10.192.2.9    kube-node-1
quotes-77776b5bbc-wzhzz 1/1 Running 0 13m 10.192.2.7 kube-node-1 That’s it, let’s remove the Kubernetes cluster:
./dind-cluster-v1.8.sh down If you start up the cluster again with the up command, it will start up much faster than the first time!
If you don’t want to start up the cluster again, at least in any near time, you can also clean up some data created for the cluster:
./dind-cluster-v1.8.sh clean If you start up the cluster again after a clean command you are back to the very long startup time.
For more blog posts on new features in Docker, see the blog series - Trying out new features in Docker.
Tack för att du läser Callistas blogg.
Hjälp oss att nå ut med information genom att dela nyheter och artiklar i ditt nätverk.
Drottninggatan 55
111 21 Stockholm
Tel: +46 8 21 21 42
Fabriksgatan 13
412 50 Göteborg
Tel: +46 31 20 19 18
© 2022 Callista Enterprise AB


![]()
然后使用git remote来查看自己的 url,git branch -v 查看自己的分支,使用git remote set-url <your_url> https://<your_token>@github.com/
然后使用git remote来查看自己的 url,git branch -v 查看自己的分支,使用git remote set-url <your_url> https://<your_token>@github.com/
使用git push <your_url> 来更新 github
使用git push <your_url> 来更新 github
最近想把自己写的几个小程序上传到github上面,但是 github 那端已经不让使用账号密码进行验证登录了,所以在此做一个自己总结的 github token 使用教程来记录一下,以防以后再不会用了。
首先选择 setting 进入设置,然后在进入 Developer setting,选择生成私人 token。


note 随便写,天数尽量选长点时间,选上 repo 才能用 git 指令操作自己的 repositories。

可以从自己的 github 上面 clone 一个项目,例如:

值得注意的是它的格式是这样的:
你在 github 上的原始 url: https://github.com/
而你现在需要 clone 的则是:https://<your_token>@github.com/
<your_token>是你自己刚刚生成的 token,

如果正常的话,现在你已经将自己在 github 上的项目下载下来了(如果没有,建议开一下代理,毕竟 github 是国外的网站),现在就可以继续写自己的项目了,我这里为了演示就直接随便创造一些文件来代替。
现在进入自己的项目:

使用git status查看当前的状态

使用git add ./来确定更改,然后使用git commit -m ‘your update message’添加提交信息。

然后使用git remote来查看自己的 url,git branch -v 查看自己的分支,使用git remote set-url <your_url> https://<your_token>@github.com/
使用git push <your_url> 来更新 github
补充:如果当使用 git push 的时候没有显示账户密码可以使用 git config –system –unset credential.helper 更新。
或者使用 git reset 重置一下
引自: (21 条消息) github 开发人员在七夕搞事情:remote: Support for password authentication was removed on August 13, 2021._星空 - CSDN 博客_github 开发人员在七夕搞事情
https://blog.csdn.net/qq_42915526/article/details/122362565?spm=1001.2101.3001.6661.1&utm_medium=distribute.pc_relevant_t0.none-task-blog-2%7Edefault%7ECTRLIST%7ERate-1-122362565-blog-120060010.pc_relevant_antiscanv3&depth_1-utm_source=distribute.pc_relevant_t0.none-task-blog-2%7Edefault%7ECTRLIST%7ERate-1-122362565-blog-120060010.pc_relevant_antiscanv3&utm_relevant_index=1
来源:riba2534/TCP-IP-NetworkNote: 📘《TCP/IP 网络编程》(韩 - 尹圣雨) 学习笔记
🎏 此仓库是我的《TCP/IP 网络编程》学习笔记及具体代码实现,代码部分请参考本仓库对应章节文件夹下的代码。如果本笔记的内容对你有用,请点击一个 star ,转载请注明出处,谢谢。
来源:mindsdb/mindsdb: In-Database Machine Learning
mindsdb:用 SQL 开启机器学习的数据库。把机器学习引入 SQL 数据库将模型作为虚拟表(AI-table),从而省去了数据准备、预处理等步骤,可以直接用 SQL 查询时间序列、回归、分类预测的结果,实现简化机器学习开发流程的效果
MindsDB ML-SQL Server enables machine learning workflows for the most powerful databases and datawarehouses using SQL.
If you like our project then we would really appreciate a Star ⭐!
Also, check-out the rewards and community programs.
来源:科技爱好者周刊(第 208 期):晋升制度的问题 - 阮一峰的网络日志

Youtube 上面有很多 24 小时的摄像头直播频道,可以看到世界各地的实时状况。该网站就是收集这些频道,按照地区和内容分类。
来源:xxh/xxh: 🚀 Bring your favorite shell wherever you go through the ssh.
You stuffed command shell with aliases, tools and colors but you lose it all when using ssh. The mission of xxh is to bring your favorite shell wherever you go through ssh without root access and system installations.
来源:yujiangshui/A-Programmers-Guide-to-English: 专为程序员编写的英语学习指南 v1.2。在线版本请点 ->
专为程序员编写的英语学习指南。
点击这里打开在线版本 排版更好看,也可以点击查看 GitHub 源码。